OpenL Tablets BRMS Installation Guide
Release 5.26
OpenL Tablets Documentation is licensed under the Creative Commons Attribution 3.0 United States License.
Preface
OpenL Tablets is a Business Rules Management System (BRMS) based on tables presented in the Microsoft Excel documents. Using unique concepts, OpenL Tablets facilitates treating business documents containing business logic specifications as an executable source code.
OpenL Tablets provides a set of tools addressing the BRMS related capabilities including OpenL Tablets WebStudio that can be used for creating, testing, and managing business rules and business rule projects, and OpenL Tablets Rule Services designed for integration of business rules into customer applications.
The OpenL Tablets Installation Guide provides instructions for installing and customizing OpenL Tablets software. The document describes how to install OpenL Tablets under Apache Tomcat, deploy, and set up OpenL Tablets Rule Services.
All installation and configuration can be done in the application.properties file. For an example of this file with all properties described, see http://localhost:8080/webstudio/web/config/application.properties or access it at the index page of the installed OpenL Tablets WebStudio.

Figure: Accessing the application.properties file example
This section includes the following topics:
How This Guide Is Organized
Audience
Related Information
Typographic Conventions
How This Guide Is Organized
Section |
Description |
|---|---|
Before You Begin |
Lists system requirements for installing and using OpenL Tablets software. |
Install OpenL Tablets WebStudio |
Explains how to install OpenL Tablets WebStudio under Apache Tomcat. |
Deploy OpenL Tablets Rule Services |
Designed for rule developers who need to use business rules as separate web services. |
Install OpenL Tablets WebStudio and |
Explains how to install OpenL Tablets WebStudio and OpenL Tablets Rule Services on JBoss Application Server. |
OpenL Tablets WebStudio and OpenL Tablets Rule |
Explains how to set up OpenL Tablets WebStudio and OpenL Tablets Rule Services as an integrated environment. |
Troubleshooting Notes |
Provides useful information related to OpenL Tablets installation. |
Audience
This guide is mainly targeted at business users and rule experts who define, view, and manage their business rules and rule projects via OpenL Tablets WebStudio. Developers can also use this document to learn how to install and set up OpenL Tablets Rule Services.
Basic knowledge of Java and Apache Tomcat is required to use this guide effectively.
Typographic Conventions
The following styles and conventions are used in this guide:
Convention |
Description |
|---|---|
Bold |
Represents user interface items such as check boxes, command buttons, dialog boxes, drop-down list values, field names, menu commands, menus, option buttons, perspectives, tabs, tooltip labels, tree elements, views, and windows. Represents keys, such as F9 or CTRL+A. Represents a term the first time it is defined. |
|
Represents file and directory names, code, system messages, and command-line commands. |
|
Represents emphasized text in code. |
Select File > Save As |
Represents a command to perform, such as opening the File menu and selecting Save As. |
Italic |
Represents any information to be entered in a field. Represents documentation titles. |
< > |
Represents placeholder values to be substituted with user specific values. |
Hyperlink |
Represents a hyperlink. |
[name of guide] |
Reference to another guide that contains additional information on a specific feature. |
Before You Begin
This section lists the system requirements for OpenL Tablets software and introduces OpenL Tablets WebStudio instance properties. The following topics are included:
System Requirements for OpenL Tablets Software
Common Information about OpenL Tablets WebStudio Instances
System Requirements for OpenL Tablets Software
The following table covers system requirements for installing and running OpenL Tablets software:
Software |
Requirements description |
|---|---|
Operating systems |
One of the following: |
Browsers |
One of the following: |
Data Bases |
One of the following: |
Other software |
|
Hardware requirements: RAM 4 GB minimum. 6 GB is recommended. 1 GHz or faster 32-bit (x86) or 64-bit (x64) processor.
User rights requirements: Administrative permissions are required to install the software under Microsoft Windows or UNIX system.
!!! note It is highly recommended to avoid using spaces and special characters in paths.
Common Information about OpenL Tablets WebStudio Instances
This section provides general information about OpenL Tablets WebStudio home directory structure and resources shared among multiple OpenL Tablets WebStudio instances. The following topics are included:
OpenL Tablets WebStudio Home Directory Configuration
Starting OpenL Tablets WebStudio in the Cluster Mode
Sharing webstudio.properties
Sharing Project History
Sharing Project Index
OpenL Tablets WebStudio Home Directory Configuration
When OpenL Tablets WebStudio is run for the first time, by default ${user.home}/.openl is used as the openl.home or OPENL_HOME directory where the application is deployed.
This folder contents depends on configuration. Example of its contents is as follows:
locks
repositories which is a settings folder
user-workspace that contains .locks folder and folders by users with .history folders
webstudio.properties file
cache
repositories that includes deploy-config and design folders
In case of multiple OpenL Tablets WebStudio instances, a shared file storage can be defined. The openl.home.shared folder must be defined in the application.properties file before launching OpenL Tablets WebStudio for the first time.
An example of the openl.home.shared folder contents is as follows:
locks
repositories which is a settings folder
user-workspace that contains the .locks folder and folders by users with .history folders
webstudio.properties file
An example of the openl.home folder contents is as follows:
cache
repositories that includes deploy-config and design folders and by default can be set to one folder
users-db, only for a local h2 database
This option is not available if OpenL Tablets WebStudio is installed using the installation wizard. In this case, openl.home.shared is set equal to openl.home and it cannot be modified in the installation wizard.
Starting OpenL Tablets WebStudio in the Cluster Mode
To start OpenL Tablets WebStudio in the cluster mode, the openl.home.shared or OPENL_HOME_SHARED property must be defined properly. In the cluster mode, the same file storage can be used for multiple OpenL Tablets WebStudio instances.

Figure: Multiple OpenL Tablets WebStudio instances sharing the same drive
Install OpenL Tablets WebStudio under Apache Tomcat
This section describes how to set up the environment for working with OpenL Tablets software and deploy OpenL Tablets WebStudio under Apache Tomcat and provides information about settings required for proper functioning of the application.
Perform the following steps:
Installing JDK
Installing Apache Tomcat
Deploying OpenL Tablets WebStudio
Configuring External User Database
Setting Up OpenL Tablets WebStudio with Installation Wizard
Integration with External Identify Providers
OpenL Tablets WebStudio Customization
Installing JDK
To install JDK, perform the following steps:
Download JDK.
Options are as follows:
Download OpenJDK 11 available at https://openjdk.java.net/projects/jdk/11/.
Download jdk-8u231 or later from http://www.oracle.com/technetwork/java/javase/downloads/index.html to the target directory.
Further in the document, this catalog is referred to as
<JAVA_HOME>.!!! note It is highly recommended to avoid installing Java in the default Program Files directory because it can cause problems due to space characters in the path to the folder.
For more information on the installation, see http://www.oracle.com/technetwork/java/javase/index-137561.html.
Install JDK according to the instructions.
Now the environment variableJAVA_HOMEmust be set to the pathname of the directory where JDK is installed.For MS Windows, set the environment variable
JAVA_HOMEas follows:To open the System Properties window, press <Windows> + <Pause> or right click the My Computer icon and in the pop-up menu, select Properties.
In the Advanced tab, click Environment Variables.
In the System variables area, click New.
In the Variable name field, enter JAVA_HOME.
In the Variable value field, enter the path to the directory where JDK is installed, for example,
C:\Java\jdk1.8.0_231.Click OK to complete.
For Unix/Linux environments, assuming the target directory is
/usr/lib/jvm/jdk1.8.0_231, to set up the environment variableJAVA_HOMEfor a single user, proceed as follows:Log in to the account and open
.bash_profile:nano ~/.bash_profile.Add the following line
export JAVA_HOME=/usr/lib/jvm/jdk1.8.0_231.Add or correct the system PATH as follows:
export PATH=$PATH:$JAVA_HOME/binTo save, press CTRL+O and then press CTRL+X to exit.
For Unix/Linux environments, assuming the target directory is
/usr/lib/jvm/jdk1.8.0_231, to set up the environment variableJAVA_HOMEfor all users, proceed as follows:Log in as root and open the
nano /etc/profileprofile.Add the following line:
export JAVA_HOME=/usr/lib/jvm/jdk1.8.0_231.Add or correct the system PATH as follows:
export PATH=$PATH:$JAVA_HOME/bin.
Installing Apache Tomcat
Apache Tomcat can be installed from a ZIP file or using Windows Service Installer. The following topics are included in this section:
Installing Apache Tomcat on Windows
Installing Apache Tomcat on UNIX / Linux Machine
Installing Apache Tomcat on Windows
This section describes how to install Apache Tomcat on Windows and includes the following topics:
Installing Apache Tomcat from Zip File
Installing Apache Tomcat Using Windows Service Installer
Installing Apache Tomcat from Zip File
To install Apache Tomcat 7.0.x or later, proceed as follows:
Open Apache Tomcat home page at http://tomcat.apache.org/index.html.
In the left-hand Download menu, click the latest available Tomcat version.
Locate the Binary Distributions area and in the Core list, click on the ZIP file corresponding to the required Windows version.
Save the ZIP file in a temporary directory.
Extract the downloaded ZIP file into the target folder on the computer.
This folder is referred to as
<TOMCAT_HOME>further in this document.For Tomcat web server 7.0, to configure JVM options, open the
TOMCAT_HOME/conf/server.xmlfile and add theURIEncoding="UTF-8"attribute for all<Connector>elements.For example:
<Connector port="8080" protocol="HTTP/1.1" connectionTimeout="20000" redirectPort="8443" URIEncoding="UTF-8"/>
Installing Apache Tomcat Using Windows Service Installer
This section describes how to install Apache Tomcat using Windows Service Installer.
!!! note It is not recommended to select this type of installation if planning to edit rule tables in Excel files from OpenL Tablets WebStudio as described in [OpenL Tablets WebStudio User Guide], the Modifying Tables section. This type of installation requires additional setup. To solve this issue, contact your OpenL Tablets administrator.
!!! note For OpenL Tablets administrator: to enable editing rule tables in Excel files from OpenL Tablets WebStudio, enable the Allow service to interact with desktop Tomcat service option using MMC or from the command line.
Proceed as follows:
Navigate to the Apache Tomcat site at http://tomcat.apache.org/index.html and in the left-hand Download menu, click the latest available Tomcat version.
Locate the Binary Distributions area and in the Core list, click the 32-bit/64-bit Windows Service Installer link.
Save the apache-tomcat exe file in a temporary folder.
Run the exe file and follow the instructions of the installation wizard.
Click Next.
In the License Agreement window, click I Agree.
In the Choose Components dialog, leave the default Normal type of installation.
Experienced Tomcat users can select another installation type in the drop-down list.
In the Configuration dialog, proceed with default values.
In the next window, review the folder where Tomcat will be installed, the Destination Folder.
This folder is referred to as
<TOMCAT_HOME>further in this document.Click Install to start the installation.
Click Finish to complete.
As a result, Apache Tomcat is installed and started on the user’s computer. In the Notification Area located next to the clock, the
 icon appears. Tomcat is managed by using this icon or from the Start menu.
To configure JVM options for Tomcat, in the Notification area, right click the Apache Tomcat icon and select Configure; or click Start > All Programs > Apache Tomcat 7.0 > Configure Tomcat.
The Apache Tomcat Properties dialog appears.
Click the Java tab and in the Java Options text box, add the following lines:
-Xms512m
-Xmx2000m
-XX: +UseConcMarkSweepGC
-XX:PermSize=128m
-XX:MaxPermSize=512m
!!! note Every option must be manually entered in a separate row.
Click Apply and then click OK.
To restart Tomcat, in Notification Area, right click the Tomcat icon and select Stop service.
The Tomcat icon changes to
 .
.Select Start Service.
Alternatively, Tomcat can be restarted from the General tab in the Apache Tomcat Properties window which appears after selecting Start > All Programs > Apache Tomcat 7.0 > Configure Tomcat.
From this point, OpenL Tablets WebStudio can be run as described in Deploying OpenL Tablets WebStudio.
Installing Apache Tomcat on UNIX / Linux Machine
This section describes how to install Apache Tomcat on the UNIX or Linux machine and includes the following topics:
Installing Apache Tomcat from Repository
Installing Apache Tomcat from ZIP File
Configuring JVM Options for Tomcat on UNIX / Linux Machine
Installing Apache Tomcat from Repository
This section describes how to install Apache Tomcat from repository as a service on Ubuntu 12.x.
!!! note
All commands must be entered into a terminal window using an account with sudo privileges.
Proceed as follows:
Open a terminal window and enter the following:
sudo apt-get install tomcat7
Start Tomcat with the next command:
sudo /etc/init.d/tomcat7 start
All necessary folders must be located in
/var/lib/tomcat7.To ensure that Tomcat works properly, open the browser and enter http://localhost:8080.
If all is correct, Apache Tomcat displays the welcome page with a message resembling the following:
If you’re seeing this, you’ve successfully installed Tomcat. Congratulations!
If the 404 error appears, try to restart Tomcat as follows:
sudo /etc/init.d/tomcat7 restart
Alternatively, stop Tomcat by entering the following command in command line and then start it as described previously:
sudo /etc/init.d/tomcat7 stop
Installing Apache Tomcat from ZIP File
This section describes how to install Apache Tomcat on Ubuntu 12.04 and Centos 6.3. The instructions are valid for other Linux distributions with small changes.
Proceed as follows:
Download the appropriate Tomcat archive file, ZIP or
tar.gzarchive, from its official website http://tomcat.apache.org/download-70.cgi to the required user folder.In this example, Tomcat 7.0.39 is downloaded to the
/home/myuserfolder.Open a terminal window and change directory to the folder containing the Tomcat archive.
Extract the archive by entering the following command in the terminal, modifying the Tomcat version as required:
tar -zxvf apache-tomcat-7.0.39.tar.gz
The
apache-tomcat-7.0.39folder appears. For example:/home/myuser/apache-tomcat-7.0.39
Change directory to the
tomcat/bin:cd apache-tomcat-7.0.39/bin
Make sure all
*.shfiles are executable, that is, they haverin all positions to the left of the file name, for example,-rwxr-xr-x.For that, in terminal, enter the following:
ls –la
The following information is displayed:
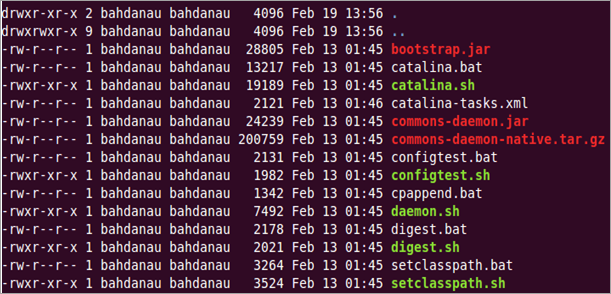
Figure: OpenL Tablets package is added
If some
shfiles are not executable, enter the following command:chmod +x ./*.sh
Run the
sturtup.shfile as follows:sh ./startup.sh
In the browser, enter the following URL:
If the installation is completed successfully, the Apache Tomcat welcome screen appears. The next thing to be done is to configure JVM options for Tomcat.
Configuring JVM Options for Tomcat on UNIX / Linux Machine
To configure JVM options for Tomcat on a UNIX / Linux machine, proceed as follows:
For UNIX, create
TOMCAT_HOME/start.cmdfile and type the following:export JAVA_OPTS="$JAVA_OPTS -Xms512m -Xmx2000m -XX:+UseConcMarkSweepGC -XX:PermSize=128m -XX:MaxPermSize=512m"Locate the
TOMCAT_HOME/conf/server.xmlfile and add theURIEncoding="UTF-8"attribute for all<Connector>elements.For example:
<Connector port="8080" protocol="HTTP/1.1" connectionTimeout="20000" redirectPort="8443" URIEncoding="UTF-8"/>From this point, deploy OpenL Tablets WebStudio as described in Deploying OpenL Tablets WebStudio.
Deploying OpenL Tablets WebStudio
This section describes how to deploy and run OpenL Tablets WebStudio under Tomcat.
The following topics are included:
Deploying OpenL Tablets WebStudio on a Windows Machine
Deploying OpenL Tablets WebStudio on a Linux Machine and Mac
Deploying OpenL Tablets WebStudio on a Windows Machine
This section describes how to deploy and run OpenL Tablets WebStudio under Tomcat on a Windows machine.
Proceed as follows:
Go to the https://openl-tablets.org/downloads page.
Click the appropriate OpenL Tablets WebStudio WAR link.
Save the file in a temporary folder and then copy the OpenL Tablets WebStudio WAR file.
For example,
openl-tablets-webstudio-X.X.X.warto the <TOMCAT_HOME>\webappsfolder.Run Tomcat as follows:
If Tomcat is installed from the ZIP file, in
TOMCAT_HOME\bin,click thestartup.batfile.If Tomcat is installed using Windows Service Installer, restart Tomcat as described in Installing Apache Tomcat Using Windows Service Installer.
Tomcat unpacks the WAR file into the
<TOMCAT_HOME>\webapps\<war file name>folder. For example, for 5.9.4 version the target folder can be<TOMCAT_HOME>\webapps\openl-tablets-webstudio-5.9.4. For convenience, the folder can be renamed as needed but remember that this name is used to launch OpenL Tablets WebStudio under Tomcat.From this point on, run OpenL Tablets WebStudio with default settings or make additional customizations by changing the user mode and configuring an external user database as described in [OpenL Tablets Rule Services Usage and Customization Guide].
To run OpenL Tablets WebStudio, in the browser, enter the following URL:
http://localhost:8080/<WAR file name>
That is, for this example, the URL is http://localhost:8080/openl-tablets-webstudio-5.9.4.
OpenL Tablets WebStudio is opened in the browser on the Welcome to Installation Wizard page. The wizard will guide through the setup process as described in Setting Up OpenL Tablets WebStudio with Installation Wizard. When setup is complete, use OpenL Tablets WebStudio to create new projects or download existing ones.
After a new release of the OpenL Tablets WebStudio is installed, click CTRL+F5 or clear cookies and cash manually to reload the page in the browser.
Deploying OpenL Tablets WebStudio on a Linux Machine and Mac
To install OpenL Tablets WebStudio under Linux and Mac OS, perform the following steps:
Create the
<OPENL_HOME>folder where the application will be deployed as follows:sudo mkdir /<OPENL_HOME>
Change access rights for this folder by entering the following command in the command line:
sudo chmod 775 -R /<OPENL_HOME>
Change the owner for this folder:
sudo chown tomcat7:tomcat7 /<OPENL_HOME>
Download OpenL Tablets WebStudio WAR file from https://github.com/openl-tablets/openl-tablets/releases/ to a temporary folder.
Copy the downloaded WAR file to the Tomcat
webappsfolder:cp /home/myuser/Downloads/<openl-tablets-webstudio-xxxx.war>/home/myuser/<TOMCAT_HOME>/webapps/webstudio.war
To stop Tomcat, run the following command from
/home/myuser/<TOMCAT_HOME>/bin:sh shutdown.sh
Start Tomcat from the same folder as follows:
sh startup.sh
In the browser, enter http://localhost:8080/webstudio.
If deployment is completed without errors, the OpenL Tablets WebStudio Installation Wizard described in the next step is opened in the browser.
If encountering any problems, for more information, see the following log files:
home/myuser/<TOMCAT_HOME>/logs/catalina.outandhome/myuser//<TOMCAT_HOME>/logs/webstudio.log
Configuring External User Database
This step is only required if a user is planning to work in multi-user application modes such as Multi-user, Active Directory, SSO: CAS, SSO: SAML, or SSO:OAuth2. For more information, see Setting Up OpenL Tablets WebStudio with Installation Wizard and use an external database such as MySQL for managing users in OpenL Tablets WebStudio.
By default, OpenL Tablets WebStudio can run using an internal user database based on the H2 database engine. It is a good idea to use the internal user database for demonstration purposes because it is provided by default and requires no additional setup. But in this case, all user management changes will be lost after server restart.
In a production environment, it is strongly recommended to use an external database.
Note: For more information on supported platforms, see https://openl-tablets.org/.
The following topics are included:
Adding Drivers and Installing and Configuring the Database
Configuring MySQL Database as External User Storage
Configuring MariaDB Database as External User Storage
Configuring Oracle Database as External User Storage
Adding Drivers and Installing and Configuring the Database
Before configuration, perform the following steps:
Add the appropriate driver library for a database in OpenL Tablets WebStudio to
\WEB-INF\lib\.Alternatively, locate required libraries directly in
\<TOMCAT_HOME>\libwith other Tomcat libraries.Database
Driver
MySQL
mysql-connector-java-5.1.31.jarMariaDB
mariadb-java-client-2.0.1.jarOracle
ojdbc6.jarMS SQL
mssql-jdbc-7.2.2.jre8.jarPostgreSQL
postgresql-9.3-1100.jdbc4.jarFor more information on URL value according to the database type, see the URL value according to the database type table in Setting Up OpenL Tablets WebStudio with Installation Wizard.
Install the database, defining login and password and creating a new schema or service.
Ensure all database settings are completed.
Start OpenL Tablets WebStudio and in the third step, select a Multi-user, Active Directory, or SSO mode.
Define database URL, username, and password.
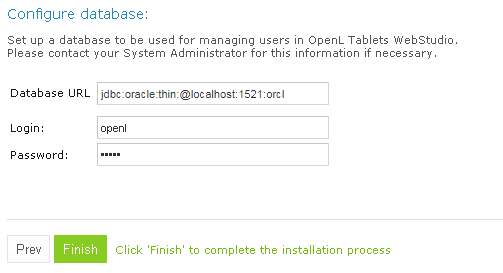
Figure: Creating a connection to the Oracle database in the installation wizard
Click Finish to close the wizard when the installation is complete.
Log in with credentials of an administrative user defined in the third step of the installation wizard, in the Configure initial users section.
Note that even after configuring the database as user storage, a default user is available for login. The default user can manage user settings in OpenL Tablets WebStudio, for example, create a user or add privileges to a user. All user management activities can be performed via the OpenL Tablets WebStudio UI, in the Admin > User Management section.
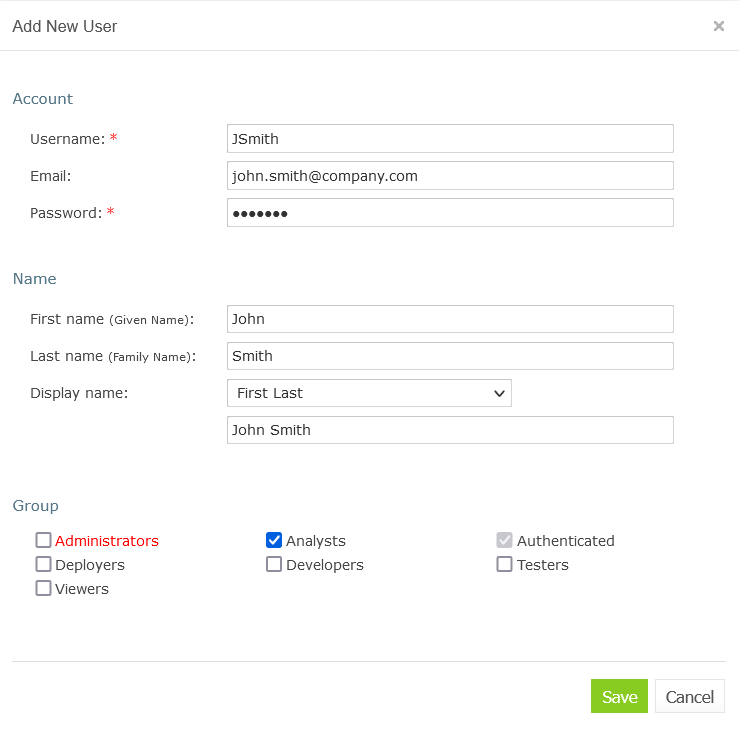
Figure: Managing users in the User Management section of OpenL Tablets WebStudio
Right after applying changes in OpenL Tablets WebStudio, the updates are applied to the database. A user can log in and work under a newly created account in OpenL Tablets WebStudio.
!!! note During installation, several tables are created in the database. If the same tables exist in the database from the previous usage, a conflict occurs. To avoid this situation, the following tables must be removed: - ACCESSCONTROLENTRY - GROUP2GROUP - OPENLUSER - schema_version - USER2GROUP - USERGROUP - HIBERNATE_SEQUENCE table that has
SEQUENCE_OWNER=OPENL- OPENL_EXTERNAL_GROUPS - OPENL_TAG_TYPES - OPENL_TAGS - OPENL_PROJECTS - OPENL_PROJECT_TAGS - OPENL_TAG_TEMPLATES
Configuring MySQL Database as External User Storage
This section explains how to set up a MySQL database. Proceed as follows:
Select the appropriate MSI Installer for system configuration and click Download.
For example, Windows (x86, 32-bit), MSI Installer may be needed. It is recommended to use ZIP Archive version since it is intended for advanced users.
In the next window, register or log in to the MySQL site.
This step can be skipped, and users can proceed to No thanks, just start my download! link.
In the next window, select Save File and save the
.msifile in a target folder.Navigate to the folder containing the
.msifile and double click the file to start the installation process.The MYSQL Server Setup Wizard Welcome window appears.
Follow the wizard steps leaving the default values and clicking Next to proceed.
Click Finish to close the wizard when installation is complete.
**Note:** It is recommended to configure the database server to use the UTF-8 character set.
When MySQL is successfully installed on the user’s computer, an empty database for OpenL Tablets WebStudio in MySQL must be created and permissions to modify this database granted to the user from which the OpenL Tablets WebStudio will work with this database.
To open MySQL Command Line Client, select Start > All Programs > MySQL > MySQL Server 5.5 > MySQL Command Line Client and enter the following commands:
CREATE USER openl_user IDENTIFIED BY 'openl_password';CREATE DATABASE openl CHARACTER SET utf8;GRANT ALL PRIVILEGES ON openl.* TO openl_user;
Configuring MariaDB Database as External User Storage
This section explains how to set up an MariaDB database. Proceed as follows:
Select the appropriate version and click Download.
Select the appropriate MSI Installer for system configuration and click Download.
In the next window, select Save File and save the .msi file in a target folder.
Navigate to the folder containing the .msi file and double click the file to start the installation process.
The MariaDB Setup Wizard Welcome window appears.
Follow the wizard steps leaving the default values and clicking Next to proceed.
Define password for a root user.
Create a database.
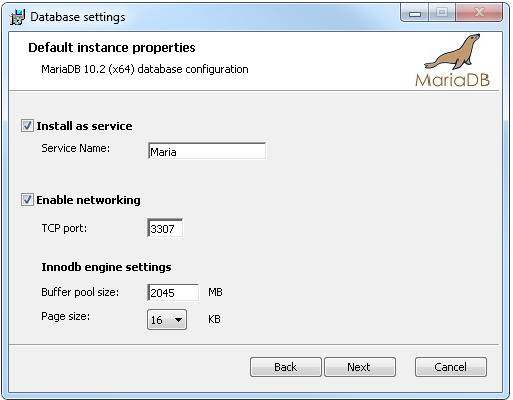
Figure: Setting properties for the MariaDB database
Click Finish to close the wizard when the installation is complete.
Start HeidiSQL application.
Click New to create a session.
Select the Prompt for credentials check box and define a database port.

Figure: Creating a connection to the MariaDB database
Click Open and save the changes.
Configuring Oracle Database as External User Storage
This section explains how to set up an Oracle database. Proceed as follows:
Go to http://www.oracle.com/technetwork/database/enterprise-edition/downloads/index.html.
After registration, select the appropriate version and system configuration, and click Download.
Unzip 2 archives in one folder and click the
exefile.Configure the database and define a username and password.
These values will be used further for configuration.
To improve work with database, download Oracle SQL Developer at http://www.oracle.com/technetwork/developer-tools/sql-developer/overview/index.html.
In this section, as an example, Oracle SQL Developer 3.2.2 is used.
Start Oracle Workbench and create a connection or select an existing database connection.
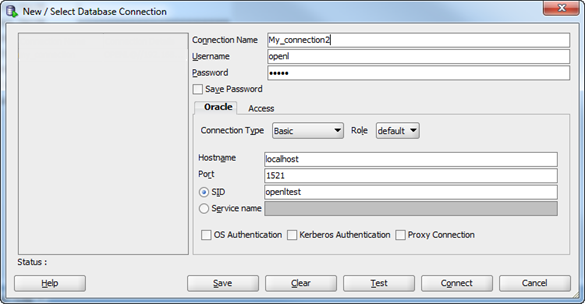
Figure: Creating a connection to the Oracle database
Enter username and password values defined when installing the database.
Setting Up OpenL Tablets WebStudio with Installation Wizard
This topic describes the steps that must be taken after the first run of OpenL Tablets WebStudio under Tomcat. Accept the default options provided by the wizard by clicking Next to move to the next step or change the options as required and click Next to proceed.
Proceed as follows:
In the Welcome to OpenL Tablets WebStudio Installation Wizard window, click Start.
In the next window, specify a working directory for OpenL Tablets.
By default, the following directory is displayed:
${user.home}/.openlThis folder is referred to as
<OPENL_HOME>in the documentation. It is highly recommended not to use the system drive for that.Click Next to proceed.
Specify deployment and design repositories:
Type
Description
Database (JDBC)
The repository is located in a database installed either local or remote.
The Repository URL field displays URL for access to the database.Database (JNDI)
The repository is located in a database installed either locally or remotely.
The Repository URL field displays URL for accessing the database.
Configuration settings are located in configuration files of the web server application.AWS S3
The repository is located in Amazon Simple Storage Service (AWS S3).
A “bucket” is a logical unit of storage in AWS S3 and is globally unique.
Choose a region for storage to reduce latency, costs etc. An Access key and a Secret key are needed to access storage.
If empty, the system will retrieve it from one of the known locations as described in AWS Documentation. Best Practices for Managing AWS Access Keys.
The Listener period is the interval in which to check repository changes, in seconds.Git
The Git repository is a version control system.
The Git repository can be configured as local or remote.
The URL field displays URL for the remotely located Git repository or file path to the repository stored locally.
The Local path identifies the folder where a Git repository local copy is stored.
For more information on connection settings, see [OpenL Tablets WebStudio User Guide].If deploy configuration must be stored in a separate repository, not in Design repository, the Use Design Repository check box must be cleared and required parameter values must be provided.
The following table explains URL values according to the database type:
Database
URL value
MySQL, MariaDB
jdbc:mysql://[host][:port]/[schema]Oracle
jdbc:oracle:thin:@//[ host][:port]/serviceMS SQL
jdbc:sqlserver://[serverName[\instanceName][:port]][;property=value[;property=value]]PostgreSQL
jdbc:postgresql://[host][:port]/[schema]For more details about how to configure the repository of a specific type, please refer to the corresponding section below:
Configuring OpenL Tablets WebStudio via JDBC Connection
Configuring OpenL Tablets WebStudio via JNDI Connection
Configuring OpenL Tablets WebStudio via Amazon Simple Storage Service
Connecting to OpenL Tablets WebStudio via Proxy
For more information on repository security, see [OpenL Tablets WebStudio User Guide], the Repository Settings section.
Click Next.
Select a user mode as described in the following table:
Mode
Description
Demo
This is a multi-user mode with the list of users predefined in the default database.
The database does not require additional setup.
All changes in the database will be lost after the application restart.Single-user
Only the user currently logged on to the computer can work with the OpenL Tablets WebStudio.
For more information on the single user mode, see [OpenL Tablets WebStudio User Guide].Multi-user (recommended)
Multiple users can run OpenL Tablets WebStudio with their unique names.
WebStudio is used to authenticate and manage user credentials/permissions with External database.Active Directory
Multiple users can run OpenL Tablets WebStudio using their unique user names.
Active Directory will be used to authenticate and manage user credentials.SSO: CAS
Multiple users can run OpenL Tablets WebStudio using their unique user names.
CAS (Central Authentication Service) server will be used to authenticate and manage user credentials.SSO: SAML
Multiple users can run OpenL Tablets WebStudio using their unique user names.
SAML (Security Assertion Markup Language) supporting Identity Provider server will be used to authenticate and manage user credentials.SSO:OAuth2
Multiple users can run OpenL Tablets WebStudio using their unique user names.
User projects will be located in the ‘./openl-demo/user-workspace/USERNAME’ folder.
OAuth2 supporting the identity provider server will be used to authenticate and manage user credentials.For Active Directory, SSO: CAS, SSO: SAML, and SSO:OAuth2, user modes proceed as described in Integration with External Identity Providers.
If Multi-user, Active Directory, SSO: CAS, SSO: SAML, or SSO:OAuth2 mode is selected, in the Configure database area that appears, modify the database parameters as follows:
Parameter
Description
Database URL
Enter the URL for the selected database.
Login / Password
Username and password specified for the database
as defined in Configuring External User Database.Click Finish to complete setup.
As a result, for the Demo, Multi-user, Active Directory, SSO: CAS, SSO: SAML, and SSO:OAuth2 modes, the login screen appears for entering user’s credentials to start working with OpenL Tablets WebStudio. If the openl.home registry variable is defined, upon OpenL Tablets WebStudio update, after replacing the war file, re-running installation wizard is not required as the fact of configuration is recorded in the system registry. However, if there are multiple instances of OpenL Tablets WebStudio installed on the same computer, OpenL Tablets WebStudio must be run via system properties.
For a list of users predefined in the Demo application mode, see [OpenL Tablets WebStudio User Guide], User Management > Manage Users.
Configuring OpenL Tablets WebStudio via JDBC Connection
Configure design and deployment repositories settings on the second step of OpenL Tablet WebStudio installation wizard as follows:
Select JDBC as the type of the connection database (JDBC).
Provide URL and authentication data.

Figure: Setting up a JDBC connection using the installation wizard
Configuring OpenL Tablets WebStudio via JNDI Connection
To configure the OpenL Tablets WebStudio via JNDI connection, perform the following steps:
Configuring Resources for JNDI Context
Configuring Settings in OpenL Tablets WebStudio
Configuring Resources for JNDI Context
Resource settings must be configured before deploying the application. Proceed as follows:
Open the
\conf\context.xmlfile in Apache Tomcat and add theResourcetag as described in the following examples.For the Oracle database, an example is as follows:
<Resource name=”jdbc/oracleJNDI” auth=”Container”
	    type=”javax.sql.DataSource” username=”user” password=”password”
	    driverClassName=”oracle.jdbc.OracleDriver”
	    url=”jdbc:oracle:thin:@localhost:1521:orcl”
	    maxActive=”8”
	    />
For the MySQL database, an example is as follows:<Resource name=”jdbc/mysqlJNDI” auth=”Container” type=”javax.sql.DataSource” maxActive=”100” maxIdle=”30” maxWait=”10000” username=”javauser” password=”javadude” driverClassName=”com.mysql.jdbc.Driver” url=”jdbc:mysql://localhost:3306/javatest” />
For the MS SQL database, an example is as follows:<Resource name=”jdbc/mssqlJNDI” auth=”Container” type=”javax.sql.DataSource” username=”wally” password=”wally” driverClassName=”com.microsoft.sqlserver.jdbc.SQLServerDriver” url=”jdbc:sqlserver://localhost;DatabaseName=mytest;SelectMethod=cursor;” maxActive=”8” /> For the PostrgeSQL database, an example is as follows: <Resource name=”jdbc/postgres” auth=”Container” type=”javax.sql.DataSource” username=”postgres” password=”Password1” driverClassName=”org.postgresql.Driver” url=”jdbc:postgresql://localhost:5432/postgres” maxActive=”8” />
Save the
context.xmlfile.
Configuring Settings in OpenL Tablets WebStudio
Configure design and deployment repositories settings on the second step of OpenL Tablets WebStudio installation wizard as follows:
Select JNDI as the type of the connection database.
Enter a URL in the
java:comp/env/<resource name>format.Definition of the authentication data, that is, login and password, is not required in the installation wizard because this information is set in
context.xmlfile already.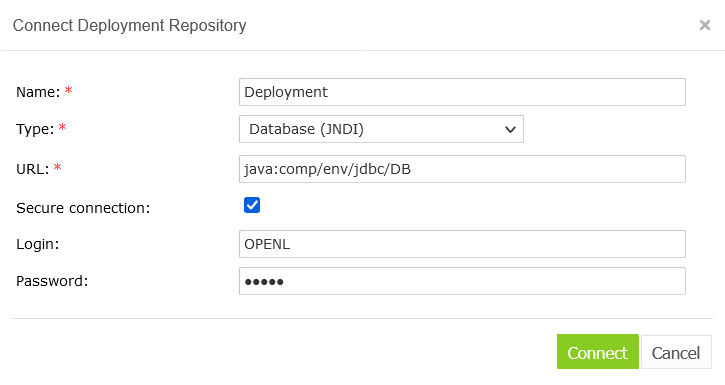
Figure: Setting up JNDI connection with installation wizard
Configuring OpenL Tablets WebStudio via Amazon Simple Storage Service
Configure design and deployment repositories settings on the second step of OpenL Tablets WebStudio installation wizard as follows:
Select AWS S3 as the type of connection.
Specify the following information:
Parameter
Description
Bucket name
Enter the name of the bucket in which your data resides.
Region name
Select the name of the AWS region in which your bucket resides.
For non-AWS S3 repositories, any value can be specified.
This value cannot be omitted as it is required by the API specification.Access key
Enter your Amazon AWS access key.
Secret key
Enter your Amazon AWS secret access key.
Listener period (sec)
The time, in seconds, to wait for the Amazon server to respond.
Endpoint
Leave empty for a standard AWS S3 connection.
To connect to the non-standard AWS S3 alternative repository, specify the endpoint.
Connecting to OpenL Tablets WebStudio via Proxy
The following diagram illustrates how to connect to OpenL Tablets WebStudio via proxy.
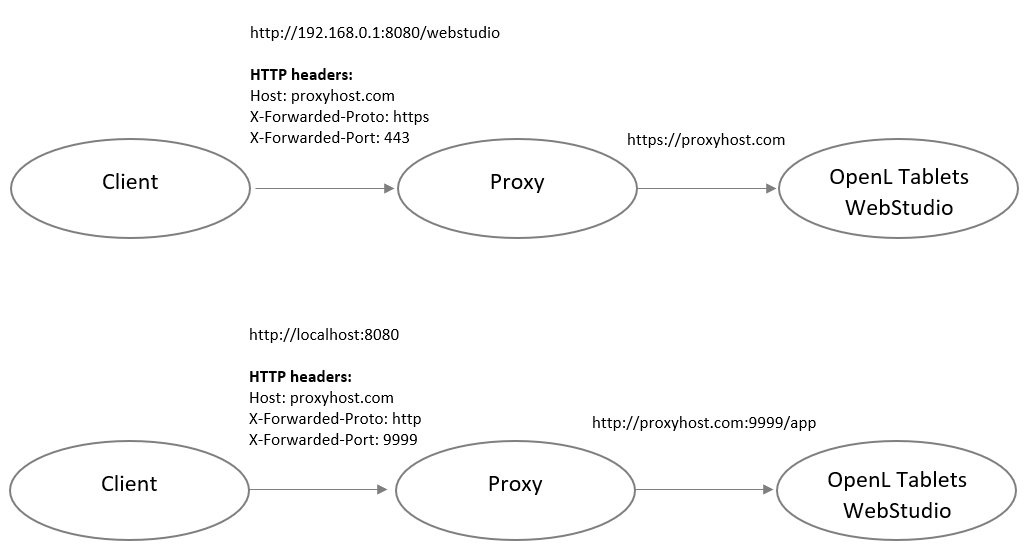
Figure: Connecting to OpenL Tablets WebStudio via proxy
Integration with External Identity Providers
To enhance sign in options for users, a third-party authentication can be established between organization authentication systems and OpenL Tablets WebStudio. After enabling third-party authentication, users can sign into OpenL Tablets using their organizational credentials.
The following topics are included in this section:
User Management
Configuring Authentication via Active Directory
Configuring Single Sign On via CAS
Configuring Single Sign On via SAML Server
Configuring Single Sign On via OAuth2
User Management
OpenL Tablets WebStudio allows selecting where user permissions are managed in the case of integration with external identity providers. First of all, administrative users must be defined in the Configure initial users section that appears in the third step of the installation wizard. Proceed as follows:
Provide at least one user to be granted administration privileges in the Administrators field.
Select the All authenticated users have View access check box to grant viewer privileges by default.

Figure: Configuring initial users
Configuring Authentication via Active Directory
This section explains how to set up authentication via Active Directory. Proceed as follows:
Specify Active Directory domain, URL, user filter, and group filter.
To verify connection to Active Directory, enter credentials of the existing Active Directory user and click Check Connection.
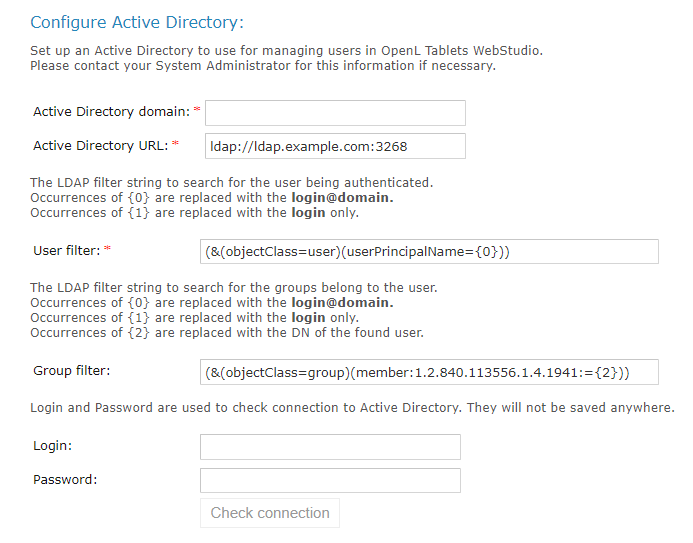
Figure: Configuring authentication via Active Directory
Configuring Single Sign On via CAS
This section explains how to set up authentication via CAS.
Define the following parameters:
Parameter |
Description |
|---|---|
WebStudio server URL |
URL for OpenL Tablets WebStudio. |
CAS server URL |
URL for the selected CAS server. |
Attribute for First Name |
CAS attribute for the first name. |
Attribute for Second Name |
CAS attribute for the second name. |
Attribute for Display Name |
CAS attribute for the display name. |
Attribute for Email |
CAS attribute for the email. |
Attribute for Groups |
CAS attribute for groups. |
!!! note Contact CAS server administrator for attribute names information.
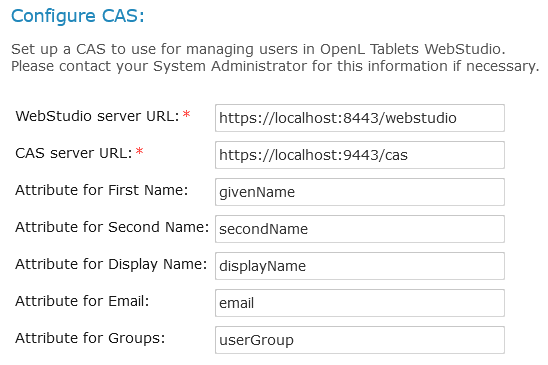
Figure: Configuring CAS
Configuring Single Sign On via SAML Server
This section describes single sign on configuration via the SAML server and includes the following topics:
Configuring SAML via the Installation Wizard
Configuring SAML on Azure Kubernetes
Configuring SAML via the Installation Wizard
This section explains how to set up authentication via the SAML server using the installation wizard.
Define the following parameters:
Parameter |
Description |
|---|---|
Entity ID |
Entity identifier. Alternatively, its value can be set for the security.saml.entity-id property, in the webstudio.properties file. |
SAML server metadata URL |
URL of the metadata XML file of the Identity Provider. |
SAML remote server X509 certificate |
PEM Base-64 encoded string, which contains a public key for SAML IDP Server. |
Attribute for Username |
SAML attribute for a username. |
Attribute for First Name |
SAML attribute for the first name. |
Attribute for Second Name |
SAML attribute for second name. |
Attribute for Display Name |
SAML attribute for the display name. |
Attribute for Email |
SAML attribute for the email. |
Attribute for Groups |
SAML attribute for groups. |
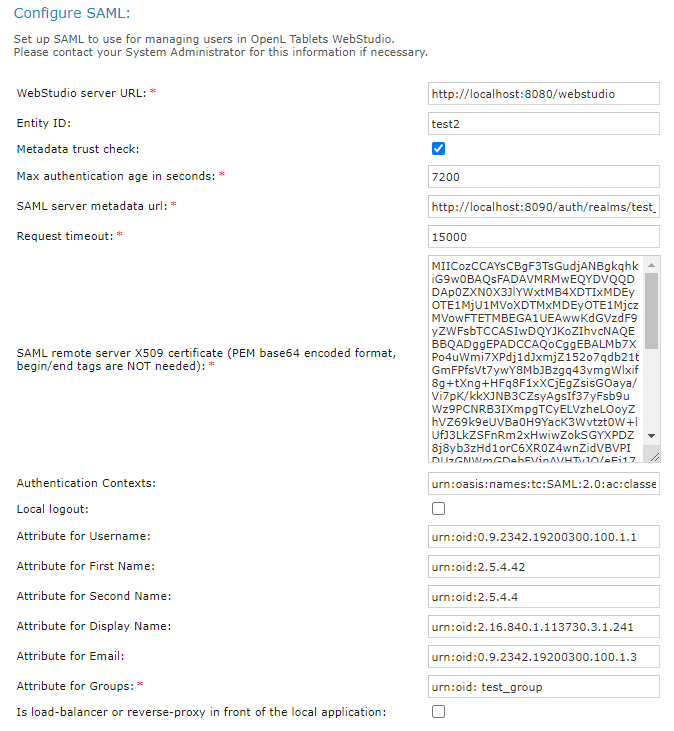
Figure: Configuring SAML
Configuring SAML on Azure Kubernetes
SAML configuration on Azure Kubernetes includes the following steps:
If the OpenL Tablets WebStudio Docker image is deployed on Azure Kubernetes, set the parameters on the Azure Basic SAML configuration as follows:
Parameter |
Description |
|---|---|
Identifier (Entity ID) |
Audience of the SAML response for IDP-initiated SSO. |
Reply URL |
Destination in the SAML response for IDP-initiated SSO. |
Logout URL |
Called URL for the logout operation. |
URLs must be accessible by Azure.
To specify the Azure metadata URL in the OpenL Tablets WebStudio, search for App Federation Metadata URL in the Azure SAML Signing certificate.
Username, first name, last name, group, and other attributes can also be retrieved from App Federation Metadata XML.
Build the image with the required JDBC driver.
OpenL Tablets WebStudio stores information about users and their groups in the database, so there must be a remote database server when OpenL Tablets WebStudio is used in Kubernetes.
In Kubernetes, application configuration is described in the configuration map and installer must not be used. For an example of the configuration, see Appendix B: OpenL Tablets WebStudio Image Configuration for SAML Under Kubernetes.
Configuring Single Sign On via OAuth2
This section explains how to set up authentication via the OAuth2 server using the installation wizard. Define the following parameters:
Parameter |
Description |
|---|---|
Client ID |
Parameter required for an identity provider to identify OpenL Tablets WebStudio as a separate service provider. |
Issuer URI |
OAuth2 authorization server URL. |
Client Secret |
Client secret. |
Scope |
Scope requested by the client during the authorization request flow, such as openid, email, or profile. https://oauth.net/2/scope/ |
Attribute for Username |
OAuth2 attribute for a username. |
Attribute for First Name |
OAuth2 attribute for the first name. |
Attribute for Second Name |
OAuth2 attribute for second name. |
Attribute for Display Name |
OAuth2 attribute for the display name. |
Attribute for Email |
OAuth2 attribute for the email. |
Attribute for Groups |
SA OAuth2 ML attribute for groups. |
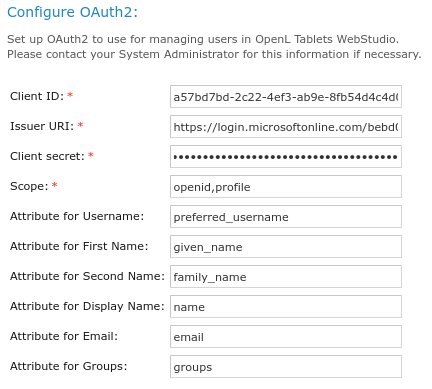
Figure: Configuring single sign on via OAuth2
An example of how to configure single sign on via OAuth2 using properties is as follows:
security.oauth2.client-id=a57bd7bd-2c22-4ef3-xxxx-xxxxxxxxxxx
security.oauth2.issuer-uri=https://login.microsoftonline.com/bebd0062-openid-connect/v2.0
security.oauth2.client-secret=xzB8Q~XxxXx-Secret-key-XxxXxxXxXxxx
OpenL Tablets WebStudio Customization
This section describes additional configuration for OpenL Tablets WebStudio and includes the following topics:
Updating User Database Configuration
Configuring User Mode
Configuring Google Analytics
Configuring Private Key for Repository Security
The changes described in this section can be made in the properties file as described in OpenL Tablets WebStudio Home Directory Configuration.
Updating User Database Configuration
An example of the configuration that can be used for the user database is as follows:
db.url = jdbc:oracle:thin:@localhost:1521:openltest
db.user = loginname
db.password = myPassword
Configuring User Mode
Normally, user mode in OpenL Tablets WebStudio is set to multi-user by using OpenL Tablets WebStudio Installation Wizard as described in Setting Up OpenL Tablets WebStudio with Installation Wizard.
User mode can also be changed as a JVM option for Tomcat. For that, open the Apache Tomcat Properties dialog as described in Installing Apache Tomcat Using Windows Service Installer, and in the Java Options text box, add the following line:
-Duser.mode=multi
Note: User mode set as a Java option takes precedence over the corresponding value specified in the OpenL Tablets WebStudio Installation Wizard. If both are defined, the Java option value is used.
Configuring Google Analytics
Google Analytics is a service offered by Google that generates detailed statistics about website traffic and traffic sources. To configure Google Analytics for OpenL, open the Apache Tomcat Properties dialog as described in Installing Apache Tomcat Using Windows Service Installer and in the Java Options text box, add the following lines:
webstudio.analytics=number
number is a number provided by Google during registration.
Configuring Private Key for Repository Security
OpenL Tablets WebStudio allows connecting to secured repositories. In this case, passwords are stored in OpenL Tablets WebStudio workspace. To improve passwords protection, a private key can be used.
Private key is a special secure sentence for coding and encoding repository passwords. By default, the private key is empty. It can be set up as a JVM option for Tomcat by adding and specifying the value of the following parameter:
secret.key=mySecretPhrase
The private key must be specified without spaces.
!!! note The private key must be configured prior to creating any secured connections. Otherwise, all stored passwords become invalid.
Deploy OpenL Tablets Rule Services under Apache Tomcat
This chapter is designed for rule developers who need to use business rules as separate web services.
For more information on how to configure OpenL Tablets Rule Services, see [OpenL Tablets Rule Services Usage and Customization Guide].
Before deploying OpenL Tablets Rule Services under Apache Tomcat, ensure the following tasks are performed:
The
JAVA_HOMEenvironment variable is set to the pathname of the directory where JDK is installed.JVM options are set up as described in Installing Apache Tomcat.
The folder where Tomcat is installed is referred to as <TOMCAT_HOME>.
This section contains the following topics:
Downloading Preconfigured OpenL Tablets Rule Services
Configuring OpenL Tablets Rule Services for a Local Data Source
Configuring OpenL Tablets Rule Services for a Database Data Source
Configuring OpenL Tablets Rule Services via AWS S3 Connection
Configuring OpenL Tablets Rule Services via GIT Connection
Downloading Preconfigured OpenL Tablets Rule Services
To download the preconfigured OpenL Tablets Rule Services application in a WAR file, proceed as follows:
Click the appropriate OpenL Tablets Rule Services WAR link.
Save the WAR file to the
<TOMCAT_HOME>\webappsdirectory.
Configuring OpenL Tablets Rule Services for a Local Data Source
This section describes how to configure settings for a local storage with deployed projects there. The following topics are included:
Configuring OpenL Tablets Rule Services via Local File System
Configuring OpenL Tablets Rule Services via Local ZIP Archives
Configuring OpenL Tablets Rule Services via Classpath JAR
Configuring OpenL Tablets Rule Services via Local File System
Using a file system as a data source for user projects means that projects are stored in a local folder. This folder represents multi deployments containing one or multiple projects for each deployment. Each deployment must be represented as a separate folder and, at the same time, the project must also be represented as a separate folder inside the deployment folder.
To deploy OpenL Tablets Rule Services, configure a local file system as a data source as follows:
Open the
application.propertiesfile.Set the following properties with the following values:
production-repository.factory = repo-file
production-repository.uri = d:/datasource/
!!! note For proper parsing of Java properties file, the path to the folder must be defined with a slash (‘/’) as the folders delimiter. Back slash “\” is not allowed.
Save the rule project in the appropriate
datasourcefolder.Every rule project must be represented as a separate folder. As an example, use OpenL Tablets Tutorial available at https://openl-tablets.org/documentation/tutorials.
To run Tomcat, in
<TOMCAT_HOME>\bin,click thestartup.batfile.
To ensure the deployment is successful, try loading the appropriate CXF page with web services.
An example is http://localhost:8080/openl-tablets-ws-X.X.X.
Users can also pack their rule projects in a jar file and use this file as a data source as described in [OpenL Tablets Rule Services Usage and Customization Guide], JAR File Data Source section.
Configuring OpenL Tablets Rule Services via Local ZIP Archives
Using a local zip archive as a data source for user projects means that zipped projects are stored in a local folder. This folder represents rule project or deployment as a separate zip archive:
Each dependent rule projects must be represented as a deployment zip archive and each project must be in a separate folder inside the deployment archive.
Each independent rule project must be represented as a separate zip archive.
To set up local zip archives for deployment to OpenL Tablets Rule Services, proceed as follows:
Open the
application.propertiesfile.Set the following properties with the following values:
	production-repository.factory = repo-zip
	production-repository.uri = d:/datasource
Save the zipped rule projects in the appropriate
datasourcefolder.Every rule project must be represented as a separate archive. As an example, use OpenL Tablets tutorial available at https://openl-tablets.org/documentation/tutorials.
It is also possible to configure separate zip archives from different locations. For that, set up the production-repository.archives property and define the exact address to the zip archive. Use the comma “,” separator to configure multiple archives. An example is as follows:
production-repository.archives = d:/datasource/project1.zip, c:/folder/project2.zip
Configuring OpenL Tablets Rule Services via Classpath JAR
If rule projects with the rules.xml project descriptor in the archive root or deployments with the deployment.xml or deployment.yaml deployment descriptor in the archive root are packed into a JAR file and placed in the classpath, these projects are deployed at the application launch. It is default configuration.
To set up a classpath JAR for deploy to OpenL Tablets Rule Services, proceed as follows:
Open the
application.propertiesfile.Set the following properties with the following values:
production-repository.factory = repo-jar
Put the JAR file with the project to
\<TOMCAT_HOME>\webapps\<rule services file name>\WEB-INF\lib.
Alternatively, zip archives with deployments or rule projects can be saved to \<TOMCAT_HOME>\webapps\<rule services file name>\WEB-INF\classes\openl.
Configuring OpenL Tablets Rule Services for a Database Data Source
This section describes how to configure settings to connect to a database for storing deployed projects there. Such configuration requires that the appropriate database exists and is launched. The following topics are included:
Configuring OpenL Tablets Rule Services via JDBC Connection
Configuring OpenL Tablets Rule Services via JNDI Connection
Configuring OpenL Tablets Rule Services via AWS S3 Connection
Configuring OpenL Tablets Rule Services via GIT Connection
Configuring OpenL Tablets Rule Services via Azure Blob Connection
Before configuration, add the appropriate driver library for a database in OpenL Tablets Rule Services to \WEB-INF\lib\.Alternatively, locate required libraries directly in \<TOMCAT_HOME>\lib with other Tomcat libraries. Install the database, defining a login and password and creating a new schema or service.
For more information on drivers, see the Driver name for appropriate databases table in Adding Drivers and Installing and Configuring the Database.
Configuring OpenL Tablets Rule Services via JDBC Connection
To set up JDBC connection settings for OpenL Tablets Rule Services, proceed as follows:
Open the
application.propertiesfile.Set the following properties with the following values:
production-repository.factory = repo-jdbc
production-repository.uri = jdbc:mysql://localhost/deployment-repository
Set the URL value for
production-repository.uriaccording to the appropriate database as described in the URL value according to the database type table in Setting Up OpenL Tablets WebStudio with Installation Wizard.Set the login
production-repository.loginand passwordproduction-repository.passwordfor connection to the database defined while installing the database.The password must be encoded via the Base64 encoding schema when
secret.keyis also defined.
Configuring OpenL Tablets Rule Services via JNDI Connection
This section describes how to configure JNDI connection when OpenL Tablets Rule Services is started under Apache Tomcat. Before configuration, ensure that resources are set up in the context.xml file as described in Configuring Resources for JNDI Context.
To configure OpenL Tablets Rule Services via JNDI connection, proceed as follows:
Open the
application.propertiesfile.Set the following properties with the following values:
production-repository.factory = repo-jndi
production-repository.uri = java:comp/env/jdbc/deploymentDB
Change the URL value for
production-repository.uriaccording to the appropriate database as described in the URL value according to the database type table in Setting Up OpenL Tablets WebStudio with Installation Wizard.!!! note
application.propertiesfile while configuring JNDI settings.
Configuring OpenL Tablets Rule Services via AWS S3 Connection
This section describes how to configure an AWS S3 connection when OpenL Tablets Rule Services is started under Apache Tomcat.
To configure OpenL Tablets Rule Services via an AWS S3 connection, add the following properties to the application.properties file:
production-repository.factory = repo-aws-s3
production-repository.bucket-name = yourBucketName
production-repository.region-name = yourS3Region
production-repository.access-key = yourAccessKey
production-repository.secret-key = yourSecretKey
Configuring OpenL Tablets Rule Services via GIT Connection
To configure OpenL Tablets Rule Services via a GIT connection, add the following properties to the application.properties file:
production-repository.factory = repo-git
production-repository.uri = https://github.com/<your-name>/<your-repo>.git
production-repository.login = your-login
production-repository.password = your-password
Configuring OpenL Tablets Rule Services via Azure Blob Connection
To configure OpenL Tablets Rule Services via the Azure Blob connection using SAS, add the following properties to the application.properties file:
production-repository.factory=repo-azure-blob
production-repository.uri=https://myStorage.blob.core.windows.net/container/?sv=2015-07-08
Install OpenL Tablets WebStudio and OpenL Tablets Rule Services on JBoss Application Server
This section explains how to install OpenL Tablets WebStudio and OpenL Tablets Rule Services on JBoss Application Server in a standalone mode.
The following topics are included:
Deploying OpenL Tablets WebStudio on JBoss Application Server
Deploying OpenL Tablets Rule Services on JBoss Application Server
Setting Up a JDBC Connection
Setting Up a JNDI Connection
Deploying OpenL Tablets WebStudio on JBoss Application Server
To deploy OpenL Tablets WebStudio on JBoss Application Server, proceed as follows:
Rename the OpenL Tablets WebStudio war file to
webstudio.war.Copy
webstudio.warto the<JBoss home directory>\standalone\deploymentsdirectory.If the
auto-deploy-zippedattribute is set totruein thestandalone.xmlfile, manually create an empty filewebstudio.war.dodeploy.Run the
<JBoss home directory>\bin\standalone.batfile.Verify that the
webstudio.war.deployedmarker is generated.To run OpenL Tablets WebStudio, in a browser, enter http://localhost:8080/webstudio/.
The Welcome to OpenL Tablets WebStudio Installation Wizard window.
Set up the application as required.
Deploying OpenL Tablets Rule Services on JBoss Application Server
To deploy OpenL Tablets Rule Services on JBoss Application Server, proceed as follows:
Rename the OpenL Tablets Rule Services file to
webservice.war.Copy the
webservice.warfile to the<JBoss home directory>\standalone\deploymentsdirectory.Run the
<JBoss home directory>\bin\standalone.batfile.Verify that the
webservice.war.deployedmarker is generated.To run OpenL Tablets Rule Services, in a browser, enter http://localhost:8080/webservice/.
Setting Up a JDBC Connection
To set up a JDBC connection for OpenL Tablets WebStudio, proceed as follows:
Download a required JDBC driver.
Run
< JBoss home directory >\bin\standalone.bat.Run JBoss command line client
<JBoss home directory>\bin\jboss-cli.bat.In Jboss-cli:, connect to the server using the
connectcommand.In Jboss-cli:, add a module using the following command:
module add --name=<module name> --resources=<path to the driver> --dependencies=javax.api,javax.transaction.apiAn example of the MySQL driver copied to the
<JBoss home directory>\bindirectory is as follows:module add --name=org.mysql --resources=mysql-connector-java-8.0.11.jar --dependencies=javax.api,javax.transaction.apiTo prepare
*.warfiles for deployment, in theMETA-INF\jboss-deployment-structure.xmlfile, add the following structure:<dependencies><module name="<module_name>" export="true" /></dependencies>For
webservice.war, in theapplication.propertiesfile, specify a connection to the database as follows:production-repository.factory = repo-jdbcproduction-repository.uri = jdbc:mysql://localhost/deployment-repositoryEnsure that the
application.propertiesfile is “visible” at the JBoss launch location.For example, if the
application.propertiesfile is located in JBoss home directory, JBoss must be run from this directory via thebin\standalone.batcommand.Configure a JDBC connection for OpenL Tablets WebStudio as described in Configuring OpenL Tablets WebStudio via JDBC Connection.
Setting Up a JNDI Connection
To set up a JNDI connection settings for OpenL Tablets WebStudio, proceed as follows:
Copy a database driver to the
<JBoss home directory>\ standalone\deployments\directory.Run the
<JBoss home directory>\bin\standalone.batfile.In a browser, enter http://localhost:8080/.
Click Administration console.
Click the Configuration link.
Select Subsystems > Datasources > Non-XA.
Click Add.

Figure: Configuring a JNDI connection
In the Create Datasource window, select a data source and click Next.
Enter the data source name and JNDI name and click Next.
Switch to the Detected Driver tab.
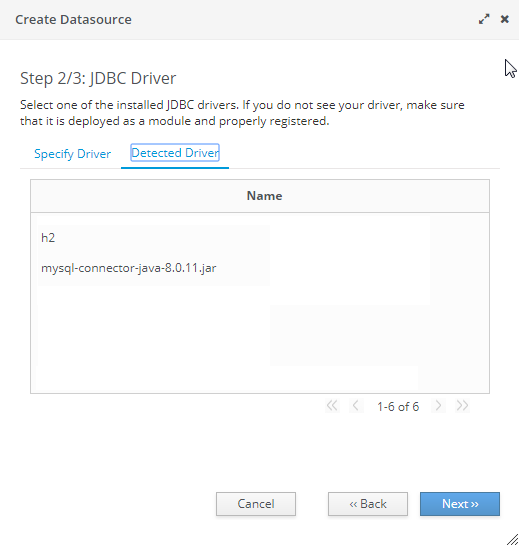
Figure: JDBC driver collection
Select a JDBC driver and click Next.
Specify database connection settings and click Next.
To test the JDBC connection, click Test Connection.
Click Next and then click Finish.
For
webservice.war, in theapplication.propertiesfile, specify the connection to a database as follows:production-repository.factory = repo-jndiproduction-repository.uri = <JNDI Name>Configure a JNDI connection for OpenL Tablets WebStudio as described in Configuring Settings in OpenL Tablets WebStudio.
OpenL Tablets WebStudio and Rule Services Integration
This section describes how to set up OpenL Tablets WebStudio and OpenL Tablets Rule Services integration and enable backward compatibility and includes the following topics:
Deploying Rules to the Production Server
Integrating OpenL Tablets WebStudio and OpenL Tablets Rule Services via Database Repository
Deploying Rules to the Production Server
After integration any changes can be made in user’s rule in OpenL Tablets WebStudio, and then the project must be saved and redeployed. These changes immediately affect the rule represented as web service. During development, rules are stored in the file system of the development server. When development is finished, rules can be deployed to the production server as follows:
OpenL Tablets WebStudio sends the rules project to the database repository, using the JDBC driver for connection, in case of integration via database repository.
The rules are saved on the production server.
OpenL Tablets Rule Services detects a new version of the deployed rules and starts using it.
The following diagram illustrates the OpenL Tablets WebStudio and OpenL Tablets Rule Services integration:
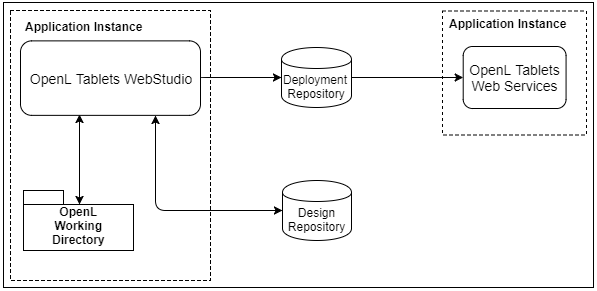
Figure: OpenL Tablets WebStudio and OpenL Tablets Rule Services deployment
Integrating OpenL Tablets WebStudio and OpenL Tablets Rule Services via Database Repository
This section describes an alternative way of how to set up an integrated environment that enables work with business rules from OpenL Tablets WebStudio and launch these rules as OpenL Tablets Rule Services. To set up OpenL Tablets WebStudio and OpenL Tablets Rule Services integration using the database as storage for deployment repository, proceed as follows:
Install OpenL Tablets WebStudio and OpenL Tablets Rule Services on the same application server.
Connect OpenL Tablets WebStudio to the database to store deployed projects as described in Setting Up OpenL Tablets WebStudio with Installation Wizard.
Configure OpenL Tablets Rule Services for a database data source as described in Configuring OpenL Tablets Rule Services for a Database Data Source.
Troubleshooting
If OpenL Tablets WebStudio is deployed under Tomcat in the Unix/Linux environment, consider the following troubleshooting recommendations:
Before starting Tomcat under Linux, make sure that no Java processes are running:
sudo ps -A | grep jIf found, the process name and number are displayed.
If any Java process is running, stop it as follows:
kill -9 <process number>Make sure that port 8080 is available as follows:
sudo netstart –an | grep 8080Run Tomcat under Linux as follows:
<TOMCAT_HOME>/bin/startup.shIf the command not found error appears, mark the
.shfile as an executable script as follows:chmod +x startup.shIf the Permission denied or The BASEDIR environment variable is not defined correctly error is displayed, make all
.shfiles in thebinfolder executable as follows:chmod 777 *.shVerify that all
.shfiles in thebinfolder are executable as follows:ls –laRun Tomcat as follows:
<TOMCAT_HOME>/bin/startup.sh
Frequently Asked Questions
This section provides the most common questions and answers related to the OpenL Tablets installation procedure. For more information on working with Java, Tomcat, and other third party software, see the corresponding sites of the software manufacturers.
# |
Question |
Answer |
|---|---|---|
1 |
How can I check if Java is installed on my PC? |
Proceed as follows: |
2 |
During Java installation, the page for Java registration appears. |
No, it is optional. You can close the registration page. |
3 |
How can I check which version of Java is installed on my PC? |
Open the Verify Java Version page and click the Verify Java Version button. |
4 |
How can I see the error message in the Tomcat |
Proceed as follows: |
Appendix A: Official Docker Images for OpenL Tablets
OpenL Tablets supports Docker containers. The following table provides links to the Docker images for OpenL Tablets:
OpenL Tablet resource |
Reference |
|---|---|
OpenL Tablets Rule Services |
|
OpenL Tablets WebStudio |
|
OpenL Tablets demo |
Appendix B: OpenL Tablets WebStudio Image Configuration for SAML Under Kubernetes
apiVersion: apps/v1
kind: StatefulSet
metadata:
  name: webstudio
spec:
  replicas: 1
  selector:
    matchLabels:
      app: webstudio
  serviceName: webstudio
  template:
    metadata:
      labels:
        app: webstudio
    spec:
      containers:
        - name: webstudio
          image: openltablets/webstudio:latest
          resources:
            limits:
              memory: "32768Mi"
            requests:
              memory: "1024Mi"
          ports:
            - containerPort: 8080
          readinessProbe:
            tcpSocket:
              port: 8080
            initialDelaySeconds: 30
            periodSeconds: 60
          livenessProbe:
            tcpSocket:
              port: 8080
            initialDelaySeconds: 60
            periodSeconds: 120
          env:
            - name: WEBSTUDIO_CONFIGURED
              value: "true"
            - name: DB_URL
              value: "jdbc:postgresql://dbserver:5432/studio_db"
            - name: DB_USER
              value: "pgadmin@studio"
            - name: DB_PASSWORD
              value: "Pa$$w0rd"
            - name: USER_MODE
              value: "saml"
            - name: SECURITY_SAML_ENTITY-ID
              value: "webstudio"
            - name: SECURITY_SAML_SAML-SERVER-METADATA-URL
              value: "https://saml-idp-server/path/to/metadata"
            - name: SECURITY_ADMINISTRATORS
              value: "mylogin@example.com"
            - name: SECURITY_SAML_SERVER-CERTIFICATE
              value: "BASE64 encoded public key (optional)"
            - name: SECURITY_SAML_ATTRIBUTE_FIRST-NAME
              value: "http://schemas.xmlsoap.org/ws/2005/05/identity/claims/givenname"
            - name: SECURITY_SAML_ATTRIBUTE_LAST-NAME
              value: "http://schemas.xmlsoap.org/ws/2005/05/identity/claims/surname"
            - name: SECURITY_SAML_ATTRIBUTE_DISPLAY-NAME
              value: "http://schemas.microsoft.com/identity/claims/displayname"
            - name: SECURITY_SAML_ATTRIBUTE_EMAIL
              value: "http://schemas.xmlsoap.org/ws/2005/05/identity/claims/emailaddress"
            - name: SECURITY_SAML_ATTRIBUTE_GROUPS
              value: "http://schemas.microsoft.com/ws/2008/06/identity/claims/role"
            - name: USER_MODE
              value: "saml"
      imagePullSecrets:
        - name: regcreds
Appendix C: CORS Filter Support Enablement in
OpenL Tablets WebStudio
Cross-Origin Resource Sharing (CORS) is a specification which is a standard mechanism that enables cross-origin requests. For more information on how to enable CORS filter support in OpenL Tablets WebStudio, see [OpenL Tablets Rule Services Usage and Customization Guide], the CORS Filter Support section.